How to Make Customised Mouse Pointers for Demos and Presentations in Windows 10

How do I customise my mouse pointer in Microsoft Windows?
There are a number of ways that you can tailor, adjust and alter your Windows mouse pointer, and we will show you how to do each of the following, as well as offering some resources to help you:
- Change the Size and Colour of your Mouse Pointer in Windows 10
- Customise the Mouse Pointer to Match your Branding in Windows 10
- Highlight your Mouse Pointer for Windows 10 Demos and Presentations
- Part One: Adding a Customised Mouse Pointer to Windows 10 Cursors
- Part Two: Setting your Custom Mouse Pointer as the Active Cursor in Windows 10
- Free Custom Mouse Pointer Highlighters to Download
In this tutorial we take a look at how to customise your mouse pointer in Windows 10 to lend clarity and professionalism to your demonstration and presentation media. You will learn how to tailor the size and colour of your pointer and also how to create a really effective custom highlighter mouse pointer which gives more focus to where on the screen you want to draw your audience's attention.
Whether you're a marketing executive, a social influencer, YouTube presenter, a professional demonstrator, educator or trainer (or even a weather presenter for that matter), having a more visible mouse pointer can make all the difference to the clarity of the information that you convey.
In fact, when giving a presentation of any sort to your audience, having a mouse pointer which is more prominent can make everything so much easier to follow.
Did you know, for instance, that you can change both the size and colour of your mouse pointer in Windows 10?
Well, if you didn't, we'll look at that first and we'll even cover customising a mouse pointer to match your branding. Secondly we will look at how to add a highlighted mouse pointer to the Windows 10 environment.
How to change the size and colour of your mouse pointer in Windows 10
You can do this really quickly and knowing how to customise the size and colour of your mouse pointer can be pretty useful; as can knowing how to switch back to the default settings.
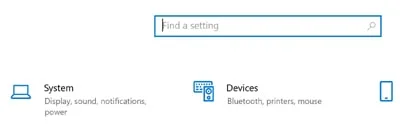
The first thing we need to do is open up our Windows 10 Settings.
You can either go to the Windows Menu and scroll down to Settings. Or, you can use the shortcut Windows Key + the I Key by holding down the two keys simultaneously.
Once we have Settings Open, select Mouse Pointer from the menu.
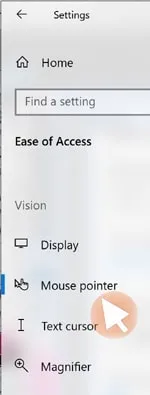
Or, if Mouse pointer does not appear in your menu, you can type 'Mouse Pointer' into the 'Find a Setting' search box.
Once we are in the Mouse Pointer settings you can see that its really straightforward to adjust the pointer size and colour.
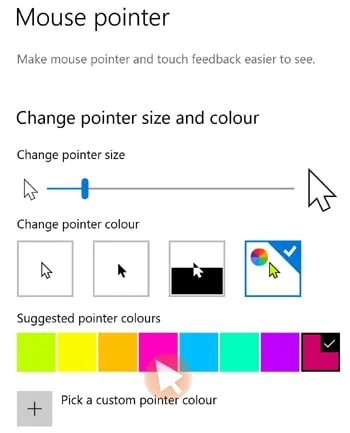
You can change the size of your mouse pointer using the slider and you can choose from a range of colour options.
My only criticism, if I have one, would be that you'ren't presented with an exact pixel or percentage size when you use the slider. It's not an essential feature but it would be nice to have.
Customising the Mouse Pointer to Match your Branding in Windows 10.
For a finishing touch with our mouse pointer customisation using native Windows 10 methods we can also adjust the colour of the pointer to perfectly match our branding for a more polished effect.
We can do this if we know the RGB or HEX colour used in our branding. If you don't already know the colour codes for the colours used in your branding then its a really good idea to find out and to keep a record of these colours to ensure that your branding is consistent across everything that you do. Services such as ImageColorPicker.com can analyse your logo and tell you what colour codes they use in both HEX and RGB (extract colour codes from an image).
Once we know what our colours are, go back to the mouse pointer page in your Settings. This time go to + Pick a custom pointer colour to open up the custom colour options.
Next, select the More option and this will open up the box we need to gain full control over our colours.
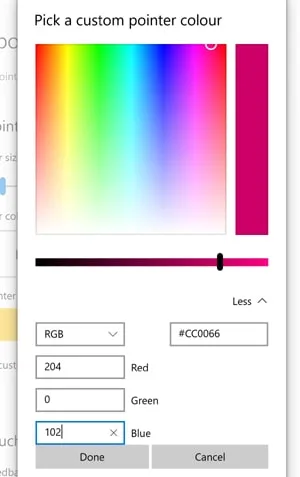
The box has now extended to give us some extra colour options to use to select our colour either from an RBG code or a HEX code. We can also choose a colour from the colour picker histogram which takes up the top half of the space here. If you experiment with the colour picker by running your mouse over it you will see that the RGB and HEX codes for each colour are usefully inserted.
Now we are going to insert our own custom colour to match our branding.
In this example we used the RGB color from the pink fullpoint in our logo which is 204 0 102 as you can see in the image above. The HEX code works equally well and its a little less work since you don't have to type in the code for three different channels.
When you're happy that you have typed in the correct pointer colour click on Done.
That's all that there is to it and your mouse pointer colour and cursors should now be perfectly in keeping with your branding and should look much more impressive.
Highlighting your Mouse Pointer for Windows 10 Demos and Presentations.
As we have seen, in Windows 10 there are native ways to change the size and colour of your mouse pointer. However, there are no native ways of highlighting your mouse pointer (or putting a transparent halo around it). Don't worry though, its still really easy to do this.
In Windows 10 your mouse pointers are just images which sit in a folder on your operating system. In order to customise them so that we can have a highlighter we need to add our own image. We have made a few mouse pointer highlighters below which are free for you to download and use (free custom mouse pointer highlighters).
If you have your own image that you want to use then its probably in the file format of a .jpeg, .gif, .png or even webp. The type of file used by Windows 10 cursors and pointers is .cur. There are a selection of free Online services that will convert your image to the .cur format. The one we used is Convertio.co: convert images with Convertio here.
If you don't have your own image and don't want to create one, then you will need to use a cursor image which has transparency for the highlighter effect. This means being able to manipulate the opacity of the image which is something that we don't expect everyone to be able to do. That's not a problem however as you can use one of the free mouse pointer highlighters that we've provided.
Part One: Adding a Customised Mouse Pointer to Windows 10 Cursors.
This part of the customising mouse pointers tutorial requires a tiny bit of knowledge about navigating Windows 10, but nothing too daunting and we will walk you through it.
We now need to add our mouse pointer image file to Windows so that it can use this as its active mouse pointer.
We need to go to the C: Drive and open the Windows folder and within the Windows folder we need to open up the Cursors folder. So that's
C: > Windows > Cursors
Here's a quick way to do it. You can open up Windows File Explorer by using the shortcut key Windows + E.

Once Windows Explorer is open you can type C: into the Quick Access bar. Don't forget to type the colon; that's C:.
Use the ENTER key and your C Drive will open up.
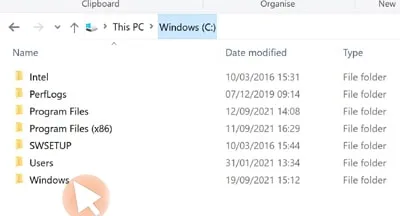
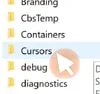
Then its just a case of opening the Windows Folder and once you're inside the Windows folder, open up the folder that is called 'Cursors'.
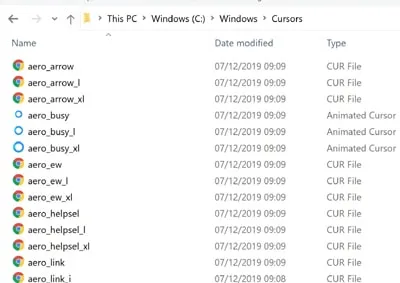
You can see that there are a tonne of files in there and mostly in the dot CUR format. In this example we are not going to replace a full set of Windows cursors but just the main mouse pointer one. This is the basic arrow pointer which we see most frequently that is known as the 'Normal Select' mouse pointer.
If you want a full set of mouse pointers then you can download some for free from the RealWorld Graphics website download free mouse pointer sets.
NOTE: Before we go any further, there is a glitch here that we need to address. If we try to change the mouse pointer size after we have set up our custom mouse pointer Windows will switch back to its default pointer image. So, if you want to change the mouse pointer size do it now. Remember that smaller mouse pointer sizes are more accurate and larger ones are more visually impactful so its a case of getting the best balance between the two.
The first thing we would usually need to do is to backup our original mouse pointer image so that we don't lose it. In this instance however, we are not going to change the original mouse pointer file, so we don't need to take a copy of it.
What we are going to do is to add a uniquely named cursor image to the Cursors folder. So you can just copy and paste the file in there (select the file, CTRL + C to copy and then CTRL + P to paste, or you can just right-mouse-click on the file to select copy and then right-mouse-click in the destination folder 'Cursors' and select paste.) You will be asked at this stage to provide administrator permission to add the file. When you're asked this click on Continue.
We have now added our new custom mouse pointer to Windows and the next thing to do is to set it up.
Part Two: Setting your Custom Mouse Pointer as the Active Cursor in Windows 10.
In order to make our new file the active mouse pointer for the 'Normal Select' function we need to go to our Mouse Properties and set our new image to the one used for the mouse pointer 'Normal Select' function.
Here's how we do it.
First, go to Settings and then select Mouse pointer from the menu, or search for 'Mouse Settings' using the search bar.
As before, to open Settings you can either go to the Windows Menu and scroll down to Settings. Or, you can use the shortcut Windows Key + the I Key by holding down the two keys simultaneously.
Once you're in the Mouse Settings, you need to scroll down to Additional mouse options which will open up the Mouse Properties dialog box.
Windows Tip: Another way you can access your Mouse Properties is to right click on your 'Desktop,' select 'Personalise' from the bottom of the menu, select 'Themes' and then 'Mouse cursor'.
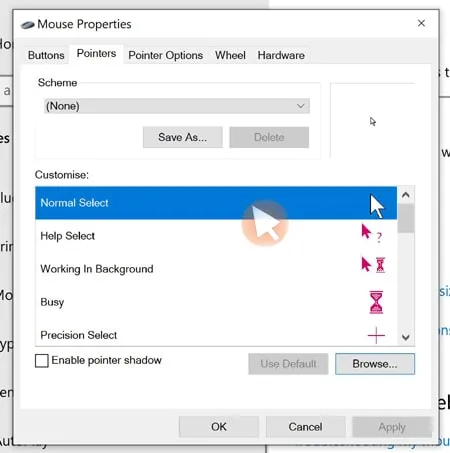
In Mouse Properties select the second tab along (Pointers).
Here we get a menu of the various mouse pointer functions and their related image icons. The one that we want is the one at the very top 'Normal Select'.
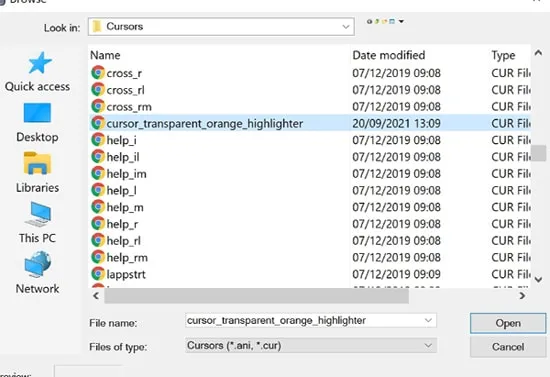
Click on 'Normal Select' and go to 'Browse'.
Once 'Browse' is open we get a list of all the cursor image files in the Cursors folder, including the one that we added earlier. This file was called cursor_transparent_orange_highlighter.cur. You will notice that I've given the custom cursor a really long name. This makes it stand out from all the others and makes it easier to find.
Scroll down the list until you find the new cursor image, select it and click on Open. This will take us back to the 'Mouse Properties' page where you need to click Apply to set this image as your new mouse pointer.

You can always switch back to the Windows native default mouse pointer by clicking on the Use Default option which will automatically switch back to the default without you having to go and look for it. And lastly, now that we have our custom pointer activated we can click OK to close the 'Mouse Properties'.
That's all there is to it. You can now use a highlighted custom mouse pointer for your demos and presentations.
The example that we used in this lesson is our transparent orange cursor which is among those that you can download for free below.
Free Custom Mouse Pointer Highlighters to Download.
Where can I get custom mouse pointer highlighters to download?
We quickly made some mouse pointer highlighters that you can download for free. All of the pointer images are in the .cur file format. We might just add some more over time if these prove popular.
 Download Orange Transparent Mouse Pointer Size: 162KB |  Download Green Transparent Mouse Pointer Size: 162KB |  Download Grey Transparent Mouse Pointer Size: 162KB |
 Download Wide Area Transparent Mouse Pointer Size: 10KB |  Download Blue Grey Transparent Mouse Pointer Size: 162KB |  Download Mustard Transparent Mouse Pointer Size: 162KB |
 Download Pink Transparent Mouse Pointer Size: 162KB |  Download Purple Meanie Mouse Pointer Size: 162KB |  Download Purple Transparent Mouse Pointer Size: 162KB |
 Download Yellow Transparent Mouse Pointer Size: 162KB |  Download Green Transparent Mouse Pointer 2 Size: 162KB |  Download Teal Transparent Mouse Pointer Size: 162KB |
We really ❤ helping organisations to master Microsoft 365. Our only question is: Will it be yours?

Our Microsoft Trainers are:
Inspirational subject experts with a wealth of experience, proven track records and excellent feedback.
Our Closed Microsoft Courses are:
Flexible instructor-led courses catering to YOUR specific learning needs and training requirements.
Education is Our Passion:
Over 35,000 students trained across almost every industry, sector and background.
Available Microsoft Word Training Courses
What Microsoft Word courses can you choose from?
Popular Microsoft Office Courses
Which other Microsoft Office courses are available?
- Microsoft 365 Courses
- Microsoft 365 Master Class
Microsoft 365 User
Microsoft 365 Overview
Office Online for Small Business Users
Office 365 Advanced User
Office 365 Power User
Microsoft Teams Configure and Manage
Microsoft Teams End User - MS Access Courses
- Beginners | Intermediate | Advanced
- Excel Courses
- Beginners | Intermediate | Advanced | Masterclass | VBA for Excel | Excel Power Query
- PowerPoint Courses
- Beginners | Advanced | PPT Specialist Designer
- Word Courses
- Beginners | Intermediate | Advanced
- Outlook Courses
- Beginners | Intermediate | Advanced
- MS Project Courses
- Beginners | Intermediate | Advanced
Word Courses North West of England Region
MS Word Courses Lancashire, Greater Manchester and Merseyside: Bolton, Lancaster, Liverpool, Manchester, Preston, Warrington, Altrincham, Barrow-in-Furness, Blackburn, Oldham
MS Word Courses Cheshire and Wirral: Birkenhead, Chester, Stockport, Ellesmere Port, Knutsford, Wallasey, Runcorn, Macclesfield, Crewe
Word Courses North East of England Region
MS Word Courses Northumberland and Tyneside: Alnwick, Newcastle-upon-Tyne, Morpeth, Hexham, Berwick-upon-Tweed
MS Word Courses County Durham: Durham, Sunderland, Stockton-on-Tees, Darlington, Gateshead, Washington, Hartlepool,
Word Courses Yorkshire and the Humber Region
MS Word Courses West Yorkshire: Leeds, Bradford, Halifax, Huddersfield, Brighouse, Wakefield, Shipley, Dewsbury, Bingley
MS Word Courses North Yorkshire: York, Harrogate, Scarborough, Whitby, Northallerton, Middlesbrough
MS Word Courses South Yorkshire: Sheffield, Barnsley, Doncaster, Rotherham, Worksop
MS Word Courses Humberside / East Riding of Yorkshire: Kingston-upon-Hull, Bridlington
Word Courses East Midlands Region
MS Word Courses Northamptonshire: Northampton, Corby, Kettering, Wellingborough
MS Word Courses Lincolnshire: Lincoln, Market Rasen, Grantham, Sleaford, Boston, Grimsby, Cleethorpes, Scunthorpe
MS Word Courses Nottinghamshire: Nottingham, Mansfield, Worksop, Newark-on-Trent, Retford, Southwell, Long Eaton, Alfreton
MS Word Courses Derbyshire: Derby, Chesterfield, Ilkeston, Swadlincote, Buxton, Matlock, Ashbourne
MS Word Courses Leicestershire: Leicester, Loughborough, Hinckley, Melton Mowbray, Coalville, Lutterworth
Word Courses West Midlands Region
MS Word Courses West Midlands county & Warwickshire: Birmingham, Coventry, Nuneaton, Rugby, Solihull, Stratford-upon-Avon, Warwick, Wolverhampton, Walsall
MS Word Courses Staffordshire: Cannock, Lichfield, Stafford, Stoke-on-Trent
MS Word Courses Worcestershire: Dudley, Evesham, Kidderminster, Stourbridge, Halesowen, Malvern, Worcester
Word Courses East of England Region
MS Word Courses Norfolk: Norwich, Great Yarmouth, King's Lynn, Dereham, Cromer, Hunstanton
MS Word Courses Suffolk: Ipswich, Bury St Edmunds, Lowestoft, Felixstowe, Sudbury, Haverhill, Bungay
MS Word Courses Essex: Chelmsford, Basildon, Romford, Southend, Colchester, Harlow, Brentwood, West Ham
MS Word Courses Cambridgeshire: Cambridge, Peterborough, Wisbech, Ely, March, Whittlesey, Chatteris, Linton
MS Word Courses Hertfordshire: Hertford, Watford, St. Albans, Hemel Hempstead, Stevenage, Hatfield
MS Word Courses Bedfordshire: Bedford, Luton, Dunstable, Leighton Buzzard, Biggleswade, Sandy
Word Courses Greater London Region
MS Word Courses London Central: London, Camden, Hackney, Hammersmith, Haringey, Islington, Kensington, Chelsea, Lambeth, Southwark, Wandsworth, City of Westminster
MS Word Courses London East: Bethnal Green, Bow, Chingford, East Ham, Hackney, Manor Park, Plaistow, Stratford, Victoria Dock, Walthamstow, South Woodford
MS Word Courses London South West: Chelsea, Clapham, Earls Court, South Kensington, Stockwell, West Brompton
MS Word Courses Battersea: Barnes, Mortlake, Putney, Streatham, Wandsworth, Wimbledon, West Wimbledon
MS Word Courses Paddington: Chiswick, Ealing, Hammersmith, Kensington, Maida Vale, North Kensington, Notting Hill, Shepherds Bush, West Ealing, West Kensington
Word Courses South West of England Region
MS Word Courses Somerset: Taunton, Bath, Bridgwater, Weston-super-Mare, Yeovil, Wells, Glastonbury
MS Word Courses Dorset: Dorchester, Bournemouth, Poole, Sherborne, Shaftesbury, Wimborne Minster, Weymouth
MS Word Courses Wiltshire: Trowbridge, Salisbury, Swindon, Chippenham, Devizes, Marlborough, Warminster
MS Word Courses Gloucestershire: Gloucester, Bristol, Cheltenham, Stroud, Cirencester, Tewkesbury
Word Courses South East of England Region
MS Word Courses Berkshire: Reading, Slough, Bracknell, Maidenhead, Newbury, Windsor, Wokingham
MS Word Courses Buckinghamshire: Aylesbury, Milton Keynes, Buckingham, High Wycombe
MS Word Courses Oxfordshire: Oxford, Abingdon, Banbury, Witney, Bicester, Henley-on-Thames, Carterton, Thame
MS Word Courses Hampshire: Winchester, Southampton, Portsmouth, Basingstoke, Newport
MS Word Courses Kent: Maidstone, Canterbury, Bromley, Rochester, Margate, Folkestone, Dover, Greenwich
MS Word Courses East and West Sussex: Chichester, Brighton, Worthing, Crawley, Hastings, Eastbourne, Bognor Regis, Horsham