 Microsoft Windows and Microsoft Office Basics - Free Tutorial for Absolute Beginners
If you're wanting to learn a Microsoft Office or Microsoft 365 software package (such as Excel, PowerPoint or Word) from scratch then it is a common assumption that you should start with a beginners course, which is of course fine for many people. However, if you're missing some of the core knowledge needed to navigate your way around the Windows environment then you might struggle to keep up regardless of whether you're self-learning from a book or a video tutorial or undertaking formal instructor-led training.
Demonstrations and tutorials sometimes make it look all too easy, and if you're not familiar with the basics of the Microsoft Windows and Microsoft Office environments they can leave you scratching your head. Don't worry, you're not alone here and very often it's just one or two core bits of knowledge that you need in order to grasp and master what's being taught.
In fact, sometimes taking a beginners course or tutorial for Office packages such as Excel, Word or PowerPoint is a bit like starting to read a book from page two. By skipping page one, you're missing the context that is actually going to make the book come to life and make sense for you.
In this foundational tutorial we will take a step-by-step look at some of the basic knowledge for the Microsoft Windows environment and the Microsoft Office packages that could really help you out before you embark on any beginners course.
In this fundamentals tutorial we assume no prior knowledge of Microsoft Windows and Microsoft Office beyond switching on your computer, logging in and being able to open, close and save files in common software packages.
We don't go into any subject matter too deeply, but rather offer a broad overview which will get you off the starting block without bogging you down.
Reading Time: 30 mins
Practical Application: 1 Hour Recommended
Download the free PDF
This Microsoft Office and Windows Absolute Beginners Tutorial is intended for:
- Non-technical people who want to start learning Microsoft Office packages.
- Those wanting to learn Microsoft Office packages for work or a new job.
- Anyone who is thinking of attending a Microsoft Office beginners course (Such as Word, Excel, Outlook or PowerPoint) and is feeling nervous or unsure.
- Anyone who is thinking of attending a Microsoft Office beginners course (Such as Word, Excel, Outlook or PowerPoint) and wants to meet the minimum requirements for attendance.
- Those who want to learn Microsoft Office for themselves but don’t know where to start.
- Those who want to start their learning journey with Information Technology using Microsoft products right from the very beginning.
Microsoft Office and Windows for Absolute Beginners Contents
Three Important Microsoft Shortcut Keys that are Really Going to Help You.
The Windows and M Shortcut Key
The Windows and E Shortcut Key
Navigating Files and Folders in Windows
Drives, Folders, Files and Software
Other Windows File Navigation Methods
A Quick Overview of Common Microsoft Software Apps
Understanding Microsoft Office Versions
Three Important Shortcut Keys that are Really Going to Help You.
Before we do anything else at all, we are going to start by learning three shortcut keys that can really help get you out of trouble whether you're struggling to find your way around the Windows environment or struggling to complete a task in one of the Microsoft Office packages.
Knowing just these three shortcut keys is incredibly advantageous when you're navigating your way around the Windows environment and indeed for any of the core Microsoft Office packages.
Shortcut keys are a combination of two or more keys on your keyboard which you hold down at the same time in order to perform a task quickly.
The Windows and M Shortcut Key
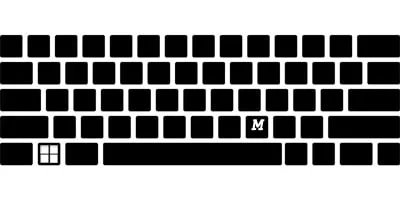
This shortcut will minimise everything that you have open, including files, folders and software packages (email, spreadsheets etc.). So, if you have too much open and the clutter is preventing you from seeing how to get to what you need, then using Windows and M is a really good idea.
You can restore each file, folder and software application to their original size individually by clicking on the icons of your open files in the bottom menu bar. In the example below we have highlighted the icons for Excel and Word.

The CTRL and Z Shortcut Key

This shortcut will UnDo the last thing that you did. This works regardless of where you're working. If you're working within files and folders or using one of the Microsoft Office software packages you can always use the CTRL and Z UnDo shortcut to UnDo your last action.
Being able to take a step backwards like this can be incredibly useful; especially if you just accidently deleted some text in Word, data in Excel or if you accidentally deleted a file or folder.
CTRL and Z is useful in many other circumstances as well and it's really worth knowing about.
This is such a useful shortcut partly because of its universality. You don't just have to be working in Microsoft packages for CTRL and Z to work. Many other software providers respect the CTRL and Z shortcut too, and it will also work in Adobe products such as PhotoShop, InDesign and Illustrator and in the software of many other vendors as well.
Limitations: CTRL and Z won't UnDo sending an email. If you send an email by mistake in Microsoft Outlook you can use the recall feature, but remember that the recipient will still receive your original email. However, if you manage to get to the email before they have read it you might be able to recall and replace it first (If they're also using Outlook for email). If you want to find out more about this handy trick, then save this short article from Microsoft for later:
The Windows and E Shortcut Key

The third shortcut that we are going to learn is Windows and E (WIN and E for short). This one opens up the File Explorer, and it is your passport to navigating your way around your files and folders quickly.
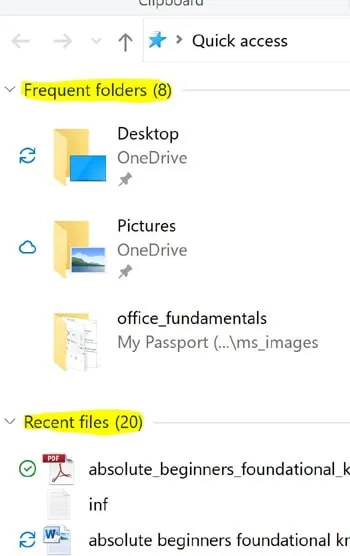
The File Explorer gives you fast access to folders that you use frequently at the top and also to files that you have recently had open in the bottom section.
It is essential to know about the Windows and E shortcut if you want to become confident with navigating around the Windows environment quickly.
It is a good idea to practice all three of these shortcut keys until you have learnt them by heart, as they'll save you an awful lot of time (and possibly frustration too) as you embark upon your journey to learn Microsoft products in more depth.
Once you know these shortcuts you're already at a distinct advantage when it comes to using Microsoft products efficiently.
Right Mouse Click Menus
wherever you are in the Windows or Microsoft Office environment, knowing about right-mouse-click menus is essential.
If you want to see what it is possible to do with a file or a folder, within a cell of data in Excel or a paragraph of text in Word, clicking on your right mouse button is your passport to seeing all of the possibilities in one menu list.
Here are some examples of right-mouse-click.
Menu for Right-Mouse-Click on a Folder:
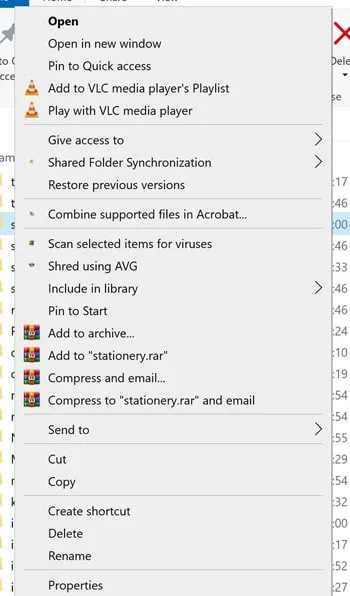
You can see that there are options on this list which are unique to this computer, but there are also universal ones. Try it for yourself.
Menu for Right-Mouse-Click on a File:
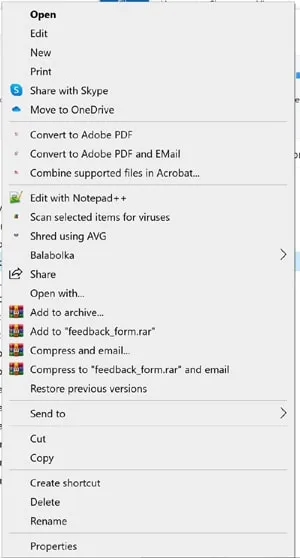
With right mouse click on a file we see a set of similar options in the menu, but there are some new ones too such as the 'Print' option and the 'Move to OneDrive' option.
Menu for Right-Mouse-Click in Word:
In this instance we selected a whole paragraph of text in Word and clicked on our right mouse button
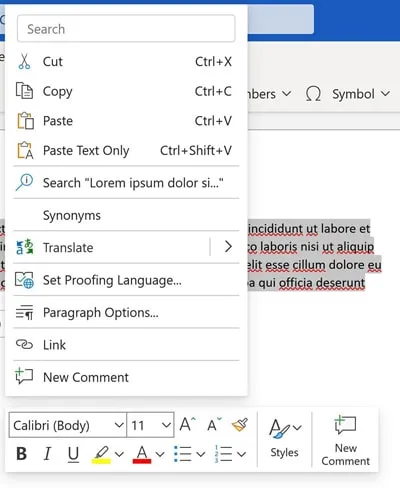
Without going in to too much detail, with right-mouse-click in Microsoft Word you get options to format your text, including the font-family and font-size, bold, italic, highlighting the text, whether it should be a list of bulleted points and much more than we can cover here.
The paint brush you see on the menu is the Format Painter.

This allows you to copy the formatting over from one selection of text and paste it into another selection of text. It's an incredibly useful little tool which has been around for a long time and we recommend that you look into it further.
The way to apply the Format Painter is to first use your mouse to select some formatted text, then click on the Format Painter icon.
The cursor icon will be replaced with a paint brush icon.
Move the cursor over the text that you want to apply the formatting to and once you have finished press the ESC key (top left of your keyboard) to switch back to the regular cursor.
If you don't master this first time, don't worry. With a bit of practice you'll get the hang of it.
Menu for Right-Mouse-Click in Excel:
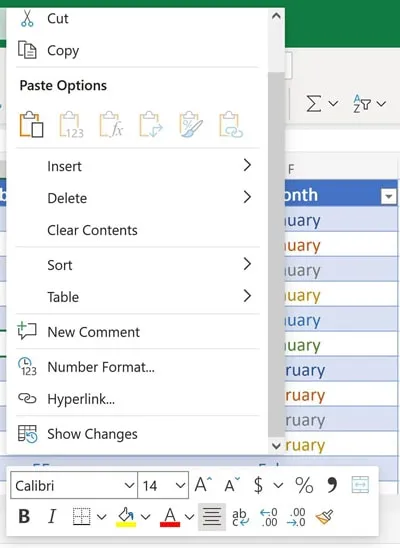
The options look very different again when we right-mouse-click on a cell of data in Microsoft Excel. As you can see we even get plenty of different options in a second menu at the bottom to format our cell, including borders, colour, font style and size as well as setting the data in that cell as a currency or as a percentage. You can wrap the text in a cell over multiple lines, set how many decimal places your data should have and, lastly, the Format Painter is also available to you in Excel.
Navigating Files and Folders in Windows 10
The File Explorer
We have previously seen how the Windows and E shortcut gives you quick access to a few navigation options in the File Explorer. Now let's look at some more of its features.
So let's open it up again using the Windows and E shortcut and take a closer look at what is there.
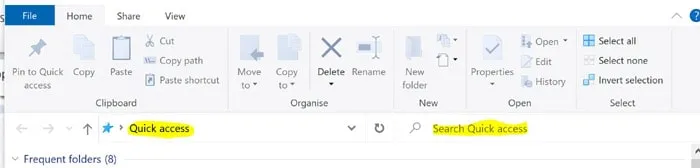
The Quick Access Bar
You can find the Quick Access Bar at the top left of the File Explorer. We've highlighted it in yellow for you in the image above.
Whether you want to open a file or a folder, or a piece of software, the Quick Access Bar gives you an incredibly efficient way of doing this.
Simply type the name of the software, file or folder into the Search Bar and the Quick Access feature will identity the full location (or 'file path') of that item and open it up for you when you click enter.
If you click the downward arrow on the Quick Access Bar it will also show you a list of the files that you open the most. Try it for yourself. Type 'Excel' into the Quick Access Bar and hit ENTER, and this smart feature will instantly find the exact location of the software and open it up for you.
The Quick Access Search Bar
To the right of the Quick Access Bar is the Quick Access Search Bar. This feature is similar, but this time we don't need to search for an exact match. If we type in a search phrase the Quick Access Search Bar will give us suggestions of files to open will similar names to what we typed into the search. This is very useful if you have files or folders with similar names and you want to quickly get to the right one.
File Explorer Tip: If you place your mouse over any of the edges of the File Explorer Pane you will see that a white double arrow icon appears.
When this icon is showing you can resize the Pane by holding down your left mouse button and then moving your mouse inwards (to make the Pane smaller) or outwards (to make the Pane bigger). You can do this with pretty much anything that you have open in Windows.
Try it for yourself.
Drives, Folders, Files and Software
Now we've had a look at one way to quickly access our files, folders and software using the File Explorer, let's have a look at where they actually live within your computer.
Once we know the basic structure of how things are stored on our computer, it's going to be that little bit easier to find your way around.
Firstly, the basic structure of your computer's working environment consists of four things: drives, folders, files and software.
Drives
At the very top level are your Drives. You can think of these as containers for your files, folders and software. A Drive is the physical section of your computer hard drive which holds within it all this information.
Your computer can have more than one drive. By default you will have a C: Drive, but your computer hard drive can also be broken down in to sections which contain other drives, all of which will be named as a letter.
These drives live physically on your computer, but there are other types of drives too. For instance, multiple people on a computer network might have access to a shared network drive with information that is held on one central server.
Or, you can even add an extra Drive to your computer with an external hard drive (external storage device) which connects to your computer via a USB cable. This Drive will be automatically assigned a letter as its name when you connect it via the USB port.
And you might also have both personal and shared files, folders and even software that lives in the Cloud on OneDrive. We will take a brief look at OneDrive a little later on.
Folders
Folders are the containers that are used to organise your information in a logical way. Folders can contain other folders, they can contain files and they can also contain software.
Files
Files are what store the information that you create. So, for instance, when you enter information in to Word or Excel or any other Office package and then save it, what you're doing is either saving a new file or updating an existing file.
Types of Microsoft Office File
This list is not comprehensive by any means, but it will get you started with understanding what types of files (or documents) you're going to encounter when working with Windows and with Microsoft Office Applications.
Files have a name and they have an extension and it is the extension (the bit following the dot) which decides what type of file they're.
Common Microsoft Office File Extensions
- Excel: .xsl .xslx
- Word: .doc .docx
- PowerPoint: .ppt .pptx
- Access: .accdb .mdb
- Outlook: .pst .ost
- OneNote: .one
Common Universal File Extensions
And a few common universal file types include:
- Text File: .txt
- Web Page: .html .xhtml .htm
- PDF document (Portable Document Format): .pdf
What is a File Path?
Now that we know something about the hierarchical structure of drives, folders and files (and a little bit about file extensions), the file path that you need to use to find your documents should make a little bit more sense.
So, here’s an example of a simple file path:
(C:)\myfolder\myotherfolder\mydocument.docx
Starting from the right-hand-side of this file path we can see that this is a Word document (.docx) which will open in Microsoft Word.
We can see that it has been placed inside a folder (myotherfolder) which is nested inside another folder (myfolder).
Finally, we can see that all of these files and folders are kept on the computer's C: Drive.
Other File Navigation Methods:
Creating Shortcuts to Files, Folders and Software on your Desktop
To create a shortcut on your Desktop, firstly right click on the item you would like to create the shortcut for.
On the menu list you will see that there is a 'Create Shortcut' option.
We are going to ignore this option and instead click on the option to 'Send To'.
The submenu for 'Send To' will give us an option to Create a shortcut on the Desktop ('Desktop (create shortcut)'). See below:
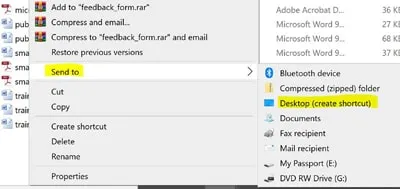
Click on 'Desktop (create shortcut)' and, as we would expect, a shortcut is created on our Desktop.
Now we have an easily accessible way of opening this up with our shortcut without having to navigate around the computer to find it.
Opening Software from the Start Menu
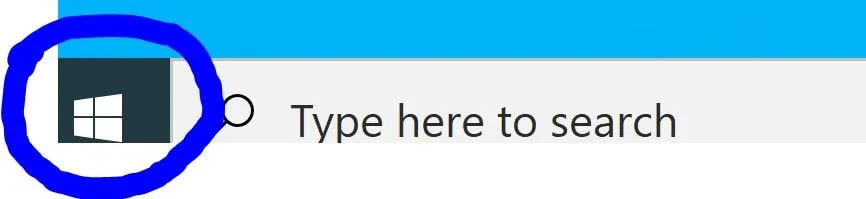
This is a fairly long-handed way of opening up software on your computer but it’s also a very logical and easy way to go about it.
Go to the Windows Icon for the Start menu on the bottom left-hand side of your screen (the Windows logo) and click on it. This will open up an alphabetical list of all the software installed on your computer. Scroll down the list until you find the one that you need and click on it to open it.
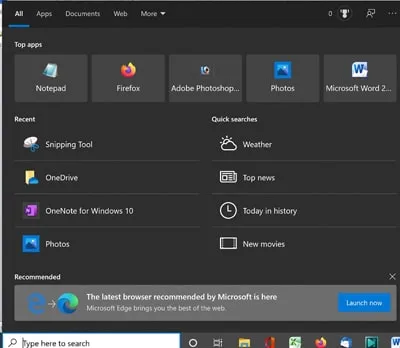
'Type here to Search'
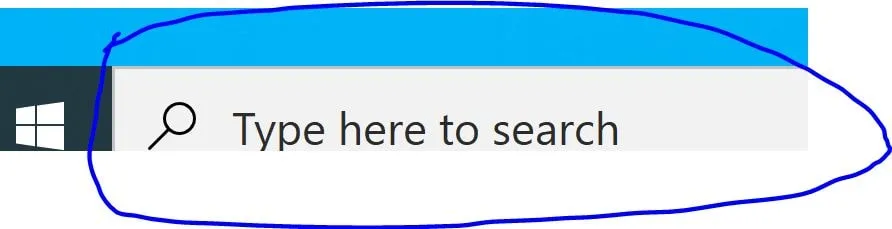
To the immediate right of the Start icon you will see a search box with a little magnifying glass inside next to the words 'Type here to search'. You can use this search bar to search for software, folders and files on your computer.
You will see a large pop-out appear which will also give you access to further options and features which you can explore for yourself.
A Quick Overview of Common Microsoft Software Apps
The traditional Microsoft Office packages consist of software applications some of which you may be familiar with. These include
- Excel: Used for spreadsheets and working with numerical data in cells, rows, columns, tables, charts and graphs.
- Word: Used for creating formatted and styled documents containing text (sentences and paragraphs) and images primarily.
- PowerPoint: Used for creating multimedia presentations to display information using key points supported by items such as charts and images in Master Slides and Slides.
- Access: Microsoft's database software which enables you to store, analyse and report upon large amounts of data.
- Outlook: Microsoft's email software, which can also be used for calendaring, scheduling and assigning tasks.
These are some of the traditional Microsoft Office applications. However, newer versions of Microsoft Office, known as Microsoft 365 (or Office 365) have a lot more useful software packages as well.
Let's take a look at a few of these that you might encounter.
- OneNote: With OneNote you can create Pages with multimedia notes which collate information from your own documents and files, and from the Web. OneNote can be used to create information for yourself or to provide resources to colleagues and students which will help them to complete tasks.
- OneDrive: Microsoft's Cloud Storage Drive which we will cover briefly in the next section.
- Sway: In some ways a Sway is quite similar to a PowerPoint presentation in that it gives you a shorthand way to inspire or influence others with snippets of multimedia information which can be presented in a variety of slide formats.
- ToDo: Allows you to create checklists of tasks that you need to perform.
- Microsoft Forms: Used to create multimedia quizzes, questionnaires and surveys. You can find our free Microsoft Forms tutorial here.
- Microsoft Teams: Video conferencing software for sophisticated multimedia meetings between colleagues and across organisations. You can find our Microsoft Teams End User course here.
- Microsoft Viva: Microsoft Viva consists of four sub-sections of software which are all intended to improve your experience as an employee, from monitoring and enhancing your wellbeing to managing your learning and development roadmap. At the time of writing Microsoft Viva is still very new in 2021 and there are still parts of it that haven't been fully launched yet.
Whilst this is by no means an extensive list, it gives you plenty to go at and to explore the Microsoft 365 environment for yourself. And, since these applications are very rapidly becoming commonplace in today's workplace you should at least take some time to familiarise yourself with them.
What's more, in today's world of computing many of these software packages (now called Apps) have features which integrate with each other in one big computing ecosystem. Learning a little bit about each one is very worthwhile as a starting point before worrying too much about the bigger picture.
Don't forget that these Apps can also exist seamlessly on all your devices including your phone, tablet, laptop and PC and, with your files all accessible from OneDrive, you can work seamlessly across all your devices.
Office 365 Tip: If you want to explore some of these modern Office Apps but don't yet have a Microsoft 365 license then you can get an excellent free version called Office for the Web which will give you access to use many of them. This can be incredibly useful if you want to give yourself a head start before you begin a new job for instance. See https://www.microsoft.com/en-gb/microsoft-365/free-office-online-for-the-web.
What is OneDrive?
When we looked at Drives earlier, we looked at physical Drives, e.g. the ones that are physically present on your computer and the ones shared across a network which are physically present on a Server.
OneDrive is another Drive that you need to be aware of. This is the Drive that you use to store files and folders in the Cloud.
OneDrive not only stores files and folders, it can also be used to back them up on the Cloud with something called Syncing.
The 'Plan' that you have with your Microsoft Account will determine how much storage space you get in OneDrive, but otherwise it is free for personal use and you can install it on all your devices including your phone and tablets to ensure that you have access to your data everywhere you go.
Syncing with OneDrive
Syncing saves files which are physically stored on your computer and creates copies of them in your Cloud storage.
In order to use syncing with OneDrive you need to be logged in to your Microsoft account.
In order to open OneDrive and see what you have stored in there you can use the method that we learnt earlier, by using the Windows key and the E key shortcut to open up the File Explorer and typing OneDrive into the search bar.
Or you can do the same by going to the search bar at the bottom left-hand-side of your screen ('Type here to search').
OneDrive Tip: When you open up OneDrive for the first time Microsoft have put a helpful file in there for you called 'Getting Started with OneDrive.pdf'. We recommend that you open up this file and read through.
Saving a File
Whichever software package you're using you can save what you're working on as a file by going to File in the top menu bar (to the very left of your software menu bar) and then by selecting Save or Save As from the dropdown list.
Save As gives you the option to save a copy of the file which will create a separate file to the one that you started with. Essentially you will now have two versions of that file.
There is also a useful shortcut key for saving a file (CTRL and S).
Note: Automatic Saving
If you're working with Office 365 in one of the Web Apps then your file will be automatically saved to OneDrive for you as you work.
However, you can still go to File on the far left of the top main menu to Save a document with Save As. Under the File menu look for the icon with three dots.
⚪ ⚪ ⚪
In modern Microsoft Apps, these three dots always mean that there is a hidden menu with more options which you should explore and this is where you will find the Save As option.
Understanding Microsoft Office Versions
Microsoft Office has been around an awfully long time now and it is not surprising that it has changed a lot over the years. As such, it can be quite important that the version you're using matches the version you're being taught in whichever learning resource you choose.
If you're just starting out and you're using a brand new copy of the latest version of Office 365, its not ideal for you to be using a learning resource which covers an older version of Microsoft Office since you don’t want to be learning by comparison, by analogy or by trying to apply what can be done in one version with what you can do (and how you do it) in another version.
A lot stays the same in Microsoft Office, but a lot changes too.
If you're unsure which version of Office you're using, the easiest way to tell (for older versions) is to open up the software itself. There is a square screen that opens before the software itself opens and this will most usually tell you the version (e.g. 2013, 2016 and so forth).
If you can access your Office software Online, then you're using Microsoft 365 (which used to be called Office 365).
The other way to tell is by how you paid for your software. If you pay by a subscription then you're using Microsoft 365. Or, if you paid for a one-off license, then you're using Office 2019 or earlier.
But what about Windows?:
Okay, so thus far we have looked at software versions within the Microsoft Office family. But how does Windows fit into all this?
For now, the best thing to do is to think of Windows as the overall container which wraps around your drives, your folders and files and your software. This is your operating system.
Just like Microsoft Office, there have been many versions of Microsoft Windows over the years, but the fundamental principle remains unchanged.
We hope that you enjoyed this tutorial.
We really ❤ helping organisations to master Microsoft 365. Our only question is: Will it be yours?

Our Microsoft 365 Trainers are:
Inspirational subject experts with a wealth of experience, proven track records and excellent feedback.
Our Closed Microsoft 365 Courses are:
Flexible instructor-led courses catering to YOUR specific learning needs and training requirements.
Education is Our Passion:
Over 35,000 students trained across almost every industry, sector and background.
MS Word Course Locations:
We have trainers who can visit your organisation in any of the following places:
Word Courses North West of England Region
MS Word Courses Lancashire, Greater Manchester and Merseyside: Bolton, Lancaster, Liverpool, Manchester, Preston, Warrington, Altrincham, Barrow-in-Furness, Blackburn, Oldham
MS Word Courses Cheshire and Wirral: Birkenhead, Chester, Stockport, Ellesmere Port, Knutsford, Wallasey, Runcorn, Macclesfield, Crewe
Word Courses North East of England Region
MS Word Courses Northumberland and Tyneside: Alnwick, Newcastle-upon-Tyne, Morpeth, Hexham, Berwick-upon-Tweed
MS Word Courses County Durham: Durham, Sunderland, Stockton-on-Tees, Darlington, Gateshead, Washington, Hartlepool,
Word Courses Yorkshire and the Humber Region
MS Word Courses West Yorkshire: Leeds, Bradford, Halifax, Huddersfield, Brighouse, Wakefield, Shipley, Dewsbury, Bingley
MS Word Courses North Yorkshire: York, Harrogate, Scarborough, Whitby, Northallerton, Middlesbrough
MS Word Courses South Yorkshire: Sheffield, Barnsley, Doncaster, Rotherham, Worksop
MS Word Courses Humberside / East Riding of Yorkshire: Kingston-upon-Hull, Bridlington
Word Courses East Midlands Region
MS Word Courses Northamptonshire: Northampton, Corby, Kettering, Wellingborough
MS Word Courses Lincolnshire: Lincoln, Market Rasen, Grantham, Sleaford, Boston, Grimsby, Cleethorpes, Scunthorpe
MS Word Courses Nottinghamshire: Nottingham, Mansfield, Worksop, Newark-on-Trent, Retford, Southwell, Long Eaton, Alfreton
MS Word Courses Derbyshire: Derby, Chesterfield, Ilkeston, Swadlincote, Buxton, Matlock, Ashbourne
MS Word Courses Leicestershire: Leicester, Loughborough, Hinckley, Melton Mowbray, Coalville, Lutterworth
Word Courses West Midlands Region
MS Word Courses West Midlands county & Warwickshire: Birmingham, Coventry, Nuneaton, Rugby, Solihull, Stratford-upon-Avon, Warwick, Wolverhampton, Walsall
MS Word Courses Staffordshire: Cannock, Lichfield, Stafford, Stoke-on-Trent
MS Word Courses Worcestershire: Dudley, Evesham, Kidderminster, Stourbridge, Halesowen, Malvern, Worcester
Word Courses East of England Region
MS Word Courses Norfolk: Norwich, Great Yarmouth, King's Lynn, Dereham, Cromer, Hunstanton
MS Word Courses Suffolk: Ipswich, Bury St Edmunds, Lowestoft, Felixstowe, Sudbury, Haverhill, Bungay
MS Word Courses Essex: Chelmsford, Basildon, Romford, Southend, Colchester, Harlow, Brentwood, West Ham
MS Word Courses Cambridgeshire: Cambridge, Peterborough, Wisbech, Ely, March, Whittlesey, Chatteris, Linton
MS Word Courses Hertfordshire: Hertford, Watford, St. Albans, Hemel Hempstead, Stevenage, Hatfield
MS Word Courses Bedfordshire: Bedford, Luton, Dunstable, Leighton Buzzard, Biggleswade, Sandy
Word Courses Greater London Region
MS Word Courses London Central: London, Camden, Hackney, Hammersmith, Haringey, Islington, Kensington, Chelsea, Lambeth, Southwark, Wandsworth, City of Westminster
MS Word Courses London East: Bethnal Green, Bow, Chingford, East Ham, Hackney, Manor Park, Plaistow, Stratford, Victoria Dock, Walthamstow, South Woodford
MS Word Courses London South West: Chelsea, Clapham, Earls Court, South Kensington, Stockwell, West Brompton
MS Word Courses Battersea: Barnes, Mortlake, Putney, Streatham, Wandsworth, Wimbledon, West Wimbledon
MS Word Courses Paddington: Chiswick, Ealing, Hammersmith, Kensington, Maida Vale, North Kensington, Notting Hill, Shepherds Bush, West Ealing, West Kensington
Word Courses South West of England Region
MS Word Courses Somerset: Taunton, Bath, Bridgwater, Weston-super-Mare, Yeovil, Wells, Glastonbury
MS Word Courses Dorset: Dorchester, Bournemouth, Poole, Sherborne, Shaftesbury, Wimborne Minster, Weymouth
MS Word Courses Wiltshire: Trowbridge, Salisbury, Swindon, Chippenham, Devizes, Marlborough, Warminster
MS Word Courses Gloucestershire: Gloucester, Bristol, Cheltenham, Stroud, Cirencester, Tewkesbury
Word Courses South East of England Region
MS Word Courses Berkshire: Reading, Slough, Bracknell, Maidenhead, Newbury, Windsor, Wokingham
MS Word Courses Buckinghamshire: Aylesbury, Milton Keynes, Buckingham, High Wycombe
MS Word Courses Oxfordshire: Oxford, Abingdon, Banbury, Witney, Bicester, Henley-on-Thames, Carterton, Thame
MS Word Courses Hampshire: Winchester, Southampton, Portsmouth, Basingstoke, Newport
MS Word Courses Kent: Maidstone, Canterbury, Bromley, Rochester, Margate, Folkestone, Dover, Greenwich
MS Word Courses East and West Sussex: Chichester, Brighton, Worthing, Crawley, Hastings, Eastbourne, Bognor Regis, Horsham
To book a training course simply call 0844 493 3699, or email info@foursquaretraining.co.uk